Edit Contact

Contact-related data can be edited by clicking on the ConvergeHub link on the Contact details page.
ConvergeHub

    • All the general information of a Contact can be edited through the General tab.
    • Multiple addresses of a Contact can be edited through the Address tab.

ConvergeHub

    • Other significant information like the Lead Source, Department, Contact Image and Description can be edited from Other tab.

ConvergeHub

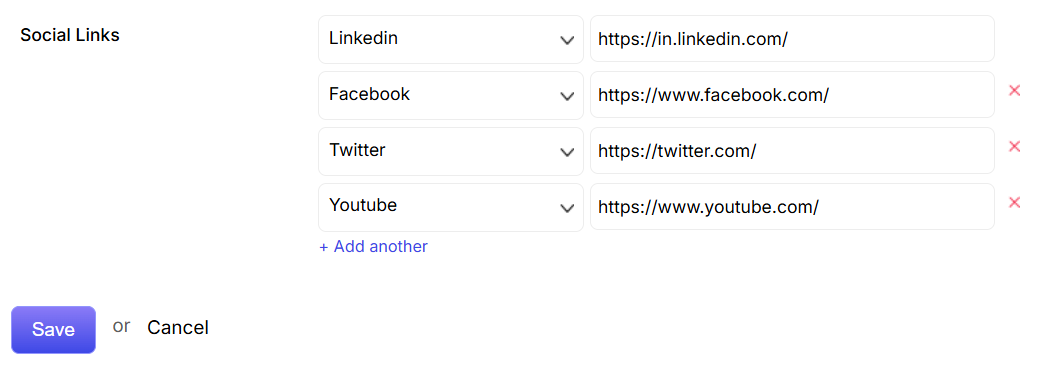
    • All the social links of a Contact can be edited from the Social Links tab.

ConvergeHub

  • Once you have completed the editing, click on ConvergeHub to implement the changes.
  • Click on ConvergeHub to nullify the changes made.

Contacts Listing

All the Contacts can be viewed in the Contacts listing page. The left panel of the Contacts Listing page includes the following options:
ConvergeHub

    • Contact can be added to the listing page either from the ConvergeHub link in the left panel or by clicking ConvergeHub button.
    • You can add bulk Contacts through a CSV file from the Import link.
    • You can create Contact reports using the options in the Reports link.

ConvergeHub

    • Perform a quick search by inputting a keyword in the search field.
    • You can also search your Contact by using various search criteria through the Advanced search link.
    • The various combination of advanced search criteria can be saved and edited with keywords of your desire and can be used to search repetitively. The keywords or phrases you have saved are available in the Saved Searches drop down.

ConvergeHub

    • By selecting check boxes beside the Contacts, you can perform multiple actions ( Add to lists, Mass Update and Email.) on them from the action drop-down.
    • You have two types of views for the Contacts listing page i.e. column view ConvergeHub and row view ConvergeHub. You can select the view depending on your requirement.
    • The display of various Contacts fields can be customized by making mouse hover on ConvergeHub and then selecting the required fields you want to display.

ConvergeHub

    • You can change the order of the top fields in the Contact listing by dragging them from the cursor to the desired position.

ConvergeHub

    • The Contacts can be added to you favorites by clicking on ConvergeHub.
    • The Contacts can be followed by clicking on ConvergeHub. You will be able to receive all the Contact’s status change and updates in the feeds.

ConvergeHub

  • You can get the options of adding task, event, note, comment; viewing followers, sending email, referring the contact to a third party and uploading a relevant file (from the computer or from the library) by hovering the cursor on a particular contact.
  • You can edit any detail (name, email, lead source and phone) of the contact by clicking on the inline edit option.
  • From the select drop down you can Create Task, Add Comment, Schedule Event, Attach Files, Copy, Email and Refer.ConvergeHub
  • You can export any contact to CSV ConvergeHub or PDF ConvergeHub format. You can also delete a contact detail by clicking on ConvergeHub
  • The Contacts listing is paginated and you can set the number of the Contacts you want to display per page.

Contact Details

Contact details page contains all the information that you have added while creating the Contact. All the detailed information is view able through the tabs General, Address, Other and Tags. The detailed relationship between Contact with Accounts, Deals, Tasks, Events, Notes and Library can be viewed from here. You will also be able to create relationship between Contact and Accounts, Deals,Tasks, Events, Notes and Library from this page.
ConvergeHub

    • The contact can be added to your favorites by clicking on.ConvergeHub
    • The contact can be followed by clicking on ConvergeHub. By doing so, you will be able to receive all the lead status change and updates in the feeds.
    • You can edit the contact detail by clicking on the ConvergeHub link.
    • You can make use of the GoToMeeting app by buying an account in this application and then inputting the account information in ConvergeHub. Please note through the GoToMeeting app, you can easily conduct meetings and conferences.The same rule is also applied in sending SMS and fax through ConvergeHub. You need to set up your account in the respective SMS and fax third party application to make use of these features.
    • It displays general information like First Name, Last Name, Assigned to, Title, Phone and Email. The comments given in relation to the contact can be viewed. New comments can also be added to the contact details.
    • Multiple addresses of the Contact can be viewed from the Address tab.

ConvergeHub

    • In the Other tab, significant information like Lead Source, Department, Created By, Last Modified By, Description and Comments is displayed.

ConvergeHub

    • The ConvergeHub will take you to the previous page.
    • The ConvergeHub icon helps you add/create contact-related accounts, lists, notes, deals, events and tasks. You can also add/create contact-related files in the library.
    • You can copy, edit, refer or add the contact to a list by clicking on the action drop down.
    • You can send SMS to the contact by clicking on this option.
    • You can put your Comments on the Comment field and can view Comments of other as well.

ConvergeHub

  • Contact-related accounts, lists, notes, deals, events and tasks is displayed here.
  • More data can be added from the CRM database to the existing list.
  • You can add new accounts, lists, notes, deals, events and tasks to the contact details.
  • There are two types of views i.e. column view ConvergeHub and row view ConvergeHub. You can select the view depending on your requirement.

Feeds Tab
You can view all the updates/comments on the Contact through the Feed tab.
ConvergeHub

  • You can share link from the ConvergeHub option.
  • You can write your own comment in the comment box and share it with other users by clicking on the ConvergeHub tab.
  • You can comment on others comment by clicking on the ConvergeHub link. You can further edit ConvergeHub or delete ConvergeHub the comment as required.
  • Like and unlike can be posted on Comments by clicking on the ConvergeHub or ConvergeHub option.

Contacts

Contacts are the category of customers whom you know and have already done business in the past. Contacts are persons who work in companies (Accounts). Through this section, you will be able to manage all your Contacts efficiently. Through Contacts, you will be able to view the details of the contacts, edit their information and track the updates.

Contacts can be managed through the following sections:

New Account

New account can be added by clicking on ConvergeHub link in the left panel or clicking on ConvergeHub button in the upper right corner of the account listing page.
Detailed information of the account can be added through five different sub tabs (general, address, other, social links and tags) which have their own corresponding fields.

General
ConvergeHub

  • Name is mandatory field, which you must fill in to create new Account.
  • The Account automatically gets assigned to the person who has created it. To change this, click on the text box and type. An auto-suggestion list of users will appear from which you can select names by ticking the check boxes. One Account can be assigned to multiple users.
  • Type in the parent account or select from the auto-suggestion list .
  • Enter multiple Phone Types and numbers by clicking on the + Add another link. You can also choose any one of the phone numbers as primary.
  • Update multiple Email addresses by clicking on the + Add another link. You can also choose any one of the Email addresses as primary.
  • Set the industry type for the account.
  • Select the type of account (Company, Person, Reseller or Vendor ) from the drop down menu.
  • Set the status for the account as Active, Inactive or Closed.
  • Click on Save to create the Account or else click on Cancel.

Address
Billing and Shipping address of the account can be added under this section.
ConvergeHub
Other
Details on the Account such as Annual Revenue, No of employees, SIC code, Ticker symbol, Ownership, Created By, Modified By and Description can be added under this section.
ConvergeHub
Social Links
Multiple Social Links of the account can be added under this section.
ConvergeHub

Edit Account

Account-related information can be edited by clicking on the ConvergeHub link on the Account details page.
ConvergeHub

  • All the general information on an Account can be edited through the General tab.
  • Multiple addresses of an Account can be edited through the Address tab.
  • ConvergeHub

  • Other significant information like Account No, Annual Revenue, Account image etc. can be edited from Other tab.
  • ConvergeHub

  • All the social links of the account can be edited from Social Links tab.
  • ConvergeHub

  • Once you have completed the editing, click on ConvergeHub to implement them.
  • Click on ConvergeHub to prevent the implementation of the new changes.

Accounts Listing

All the Accounts can be viewed in the listing page. The left panel of the Accounts Listing page includes the following options:
ConvergeHub

  • New account can be added to the listing page from the ConvergeHub link in the left column. You can also add an account by clicking on ConvergeHub tab on the upper right corner of the page.
  • You can add bulk Accounts through a CSV file from the Import link.ConvergeHub
  • You can create various Account reports using the options in the Reports link.ConvergeHub
  • ConvergeHub

  • You can perform a quick search by inputting keywords on the Search field. ConvergeHub
  • You can also search your Account by using various search criteria through the Advanced Search link.
  • The various combinations of advanced search functions can be saved and edited with keywords of your desire and can be used to search repetitively. The keywords or phrase you have saved are available on the Saved Searches drop down.
  • ConvergeHub

  • By selecting check boxes beside the Accounts, you can perform multiple actions ( Add to lists, Mass Update and Email.) on them from the action drop-down.
  • You have two types of views for the Account listing page i.e. column view ConvergeHub and row view ConvergeHub. You can select the view depending on your requirement.
  • The display of various Account fields can be customized by making mouse hover on ConvergeHub and then selecting the required fields you want to display.
  • ConvergeHub

  • You can change the order of the top fields in the Account listing by dragging them from the cursor to the desired position.
  • ConvergeHub

  • The Accounts can be added to your favorites by clicking on. ConvergeHub
  • The Accounts can be followed by clicking on ConvergeHub. By doing so, you will be able to receive all the Account status change and updates in the feeds.
  • ConvergeHub

  • You can edit any detail (name, account type, industry and email) of the account by clicking on the inline edit option.
  • You can get the options of adding task, event, note, comment; viewing followers, sending email and uploading file (from the computer or from the library) to an account by hovering the cursor on it.
  • From the select drop down you can Create Task, Add Comments, Schedule Event, Attach Files, Copy and Email. ConvergeHub
  • You can export any account to CSV ConvergeHub or PDF ConvergeHub format. You can also delete an account detail by clicking on ConvergeHub.
  • The Accounts listing is paginated and you can set the number of the Accounts you want to display per page.

User Profile

Company admin can manage his profile from the view profile section.
To view/edit the personal profile, the admin needs to click on  which appears on hovering the mouse on the account image or name at the upper right corner.

Example –

The admin can access the profile details from the left navigation as well.

The details of the Profile Setting are displayed through the tabs General, Address, Setting, and Email Signature. He can edit the profile details by clicking on the   button.

General

The General tab displays information such as First Name, Last Name, User Name, Reports, Phone, Email.
Users can edit the details by clicking on icon that appears on hovering the mouse on the present data.

Address

The Address tab displays the primary and Other address.
The admin can edit the details by clicking on button at the top or clicking on that appears on hovering the mouse on the present data.

Settings

  • The Setting tab displays the Export Charset, Export Delimiter, Time Zone, Time Format, Date Format, Phone Format, Default Phone Code, Fax Format, Landing Modules, Language and Currency. The details inputted in these fields is set default for all the modules in ConvergeHub CRM. The admin can edit the details by clicking on the  button at the top or clicking on   that appears on hovering the mouse on the present data.
  • Clicking on   will bring back the data set by default in Converge CRM.

Email Signature

The Email Signature tab displays the signature set by the admin for all his emails. Email signature can be edited by clicking on  button at the top.

Personal Setup

Company admin can manage his profile settings from this section. He can change his password and can edit the details of his profile from here.

Detailed explanation to manage Company Admin Personal Setup is as follows:

Drop downs

You can customize and create new drop down lists for different fields under different modules from the Account Setting option of your ConvergeHub account.

  • The link to create drop down is available under the App Setup section in the left hand panel of your Account Setting page.
    ConvergeHub
  • Clicking on the link will direct you to the dedicated page of creating new drop downs.
    ConvergeHub
  • A list of fields is automatically available for which you can create customized drop down menus.
  • Add new item to the drop down list by clicking on the ConvergeHub button.
  • You can edit or delete the existing drop down fields.In addition you can also edit or delete the drop down fields created by you.
    ConvergeHub
  • A pop-up will appear where you’d need to insert Name, Sequence (the order in which the field will appear), Description, Short Description and Status. The name field is mandatory to create a new drop down field value.
  • Save to create the field in the drop down list.

Layout Editor

Layout Editor allows ConvergeHub admin users to customize the look and feel of pages under the following CRM modules: Accounts, Cases, Contacts, Deals, Events, Invoices, Leads, Notes, Partner, Payments, Products, Quotations, Targets, Tasks, Assignment Rules and Users.

It includes the following three elements:

  • Label
  • Filler
  • Separator.

ConvergeHub

  • Click on Admin Settings.
    ConvergeHub
  • Click on Custom Fields under App Setup section.
    ConvergeHub
  • Click on Organize.
    ConvergeHub
  • Select the module from the drop-down list.
    ConvergeHub
  • Select the tab from the list.
  • View Custom Fields existing under the selected tab.
    ConvergeHub
  • Click on Layout Editor.
  • Drag and drop the Label to left or right panel, depending on the requirement.
  • Click to delete the Label.
  • Click on Label Settings.
    ConvergeHub
  • Name the Label. Choose the font size, style and color.
  • Copy the color code to apply to other Labels.
  • Click to restore to default color.
  • Click to save the Label properties.
    ConvergeHub
  • Drag and drop the Filler for proper spacing in the page.
  • Click to delete the Filler.
    ConvergeHub
  • Drag and drop Custom Fields in the left and right panel, as per the requirement.
  • Drag and drop the Separator in both panels to categorize the Custom Fields.
  • Click to delete the Separator.
  • Click on Separator Settings.
    ConvergeHub
  • Choose the Separator thickness and color.
  • Copy the color code to apply to other Separators.
  • Click to restore to default color.
  • Click to save the Separator properties.
    ConvergeHub
  • Insert second Label to the page.
  • Drag and drop the Filler for proper spacing.
  • Drag and drop Custom Fields in the left and right panel, as per the requirement.
  • Click on Save.
    Note: There is no minimum and maximum limit to this customization. So change the ConvergeHub UI by putting as many Labels, Custom Fields, Spaces and Separators.
    ConvergeHub
  • Once the designing is finished and saved, click on the tab under the selected module to view the customized layout. Edit the page design by adding, modifying or removing the Labels, Custom Fields, Separators and Spaces.

Account Details

All the information pertaining to an Account is displayed in the Account details page. The 4 tabs, General, Address, Other and Tags list all information on Account. Account details regarding Notes, History, Contacts, Leads, Deals, Lists, Quotes, Invoices and Activities can be viewed from here. You can also create relationship between Account and Contacts, Deals, Notes, Lists, Quotes, Invoices and Activities from this page.
ConvergeHub

  • The account can be added to your favorites by clicking on ConvergeHub.
  • The account can be followed by clicking on ConvergeHub. By doing so, you will be able to receive all the lead status change and updates in the feeds.
  • You can edit the account detail by clicking on the ConvergeHub link.
  • You can make use of the GoToMeeting app by buying an account in this application and then inputting the account information in ConvergeHub. Please note through the GoToMeeting app, you can easily conduct meetings and conferences.The same rule is also applied in sending SMS and fax through ConvergeHub. You need to set up your account in the respective SMS and fax third party application to make use of these features.
  • It displays general information like the Account Name, Industry, Assigned to, Account type, Parent Account, Phone and Email. The comments given in relation to the account can be viewed. New comments can also be added to the account details.
  • Multiple addresses of the Account can be viewed from the Address tab.
  • ConvergeHub

  • In the Other tab, significant information like Annual Revenue, No of employees, SIC code, Ticker symbol, Ownership, Created By, Modified By, Description and Comments is displayed.
  • ConvergeHub

  • The ConvergeHub will take you to the previous page.
  • The ConvergeHub icon helps you add account-related files/folders to the library or select files from the existing library.
  • You can copy, edit or add the account to a list by clicking on the action drop down. Additionally, you can also Generate Agreement from here.
  • ConvergeHub

  • You can put your Comments on the Comment field and can view Comments of others.
  • ConvergeHub

  • Information on Account-related Notes, History, Contacts, Leads, Deals, Lists, Quotes, Invoices and Activities can be viewed.
  • More data can be added from the CRM database to the existing list.
  • New data under Notes, History, Contacts, Leads, Deals, Lists, Quotes, Invoices and Activities can be added.
  • There are two types of views i.e. column view ConvergeHub and row view ConvergeHub. You can select the view depending on your requirement.

Feeds Tab
You can view all the updates/comments on the Account through the Feed tab.
ConvergeHub

  • You can also share link from the ConvergeHub option.
  • You can write your own comment in the comment box and share it with other users by clicking on the ConvergeHub tab.
  • You can further edit ConvergeHub or delete ConvergeHub the comment as required.
  • Like and unlike can be posted on Comments by clicking on the ConvergeHub or ConvergeHub option.