The quotation is the price of the product/service that the customer has intended to purchase. It takes into account all the customization and specifications requested by the customer to decide about the price for the products/services. Manage product quotations in ConvergeHub through the following segments.
Year: 2019
Contact Support
Should you encounter any issues while using ConvergeHub, such as an error or a bug, you can contact our Support Team for assistance. To do so, please click the ‘Help‘ button located in the bottom-left corner of the screen and then select ‘Contact Support.
You can learn more about Contact Support from the following.
Sales Tool Listing
All Sales Tools can be viewed in the listing page. The left panel of the Sales Tools Listing page includes the following options:
- You can view the sales tools listing page from here.
- Sales Tools can be added to the listing page either from the
 link in the left column or by clicking on
  button on the upper right corner of the page.

- You can perform a quick search by inputting keywords in the Search field.

- You can carry out an advanced search of the different sales tools by filling in the various search criteria. The search criteria will open up once you click on the
 link.
link.
- You can perform a quick search by inputting keywords in the Search field.

You can save the criteria that you put in the Advanced Search option. The criteria you save will be available on the  drop down. Doing this will prevent you from typing in the same criteria repetitively.
- By selecting check boxes beside the sales tools, you can select all the Sales Tools and from the action drop-down, you can Mass Delete them.
- The sales tools can be added to your favorites by clicking on
 icon.
icon. - You can delete a sales tool by selecting it and then clicking on
 .
. - The sales tools listing is paginated and you can set the number of the sales tools you want to display per page.
- You can copy the sales tool from the select drop-down.

- You can edit a sales tool by clicking on
 You can delete a sales tool by clicking on .
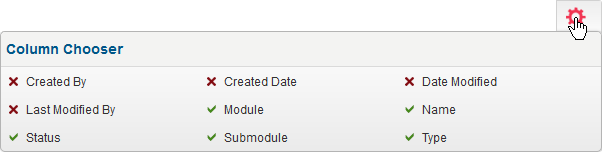
 - The display of various Sales Tools fields can be customized by making mouse hover on
 and then selecting the required fields you want to display.
- You can mass delete sales tools by selecting multiple sales tools and then clicking on delete under the action drop down.

- You can choose the display pattern (column view or row view) of the sales tools listing by clicking on either of the options.

Product Listing
You can get a complete view of the products through the product listing page. Product Name, Code, Type, Category and Status are mentioned here. You can also add, edit and delete products from this page.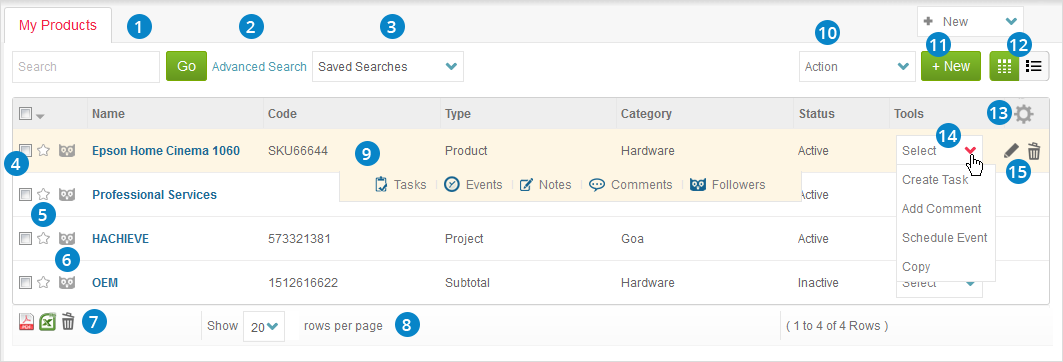
- You can perform a quick search by inputting a keyword in the search field.
- You can also search your Product by using various advanced search criteria through the Advanced search link.

- The various combination of advanced search criteria can be saved and edited with keywords of your desire and can be used to search repetitively.The keywords or phrase you have saved are available on the Saved Searches drop down.
- By selecting check boxes beside the Products, you can select one/multiple products and can mass update them through the Action drop down.
- The Products can be added to your favorites by clicking on .
- Products can be followed by clicking on
 . By doing so, you will be able to receive all the status change and updates related to the Product in the feeds.
 - You will be able to export Product listing by selecting the check boxes beside the products and then clicking on the respective icons. You may export the product details in the PDF
 or Excel
  format. You can also delete a product by clicking on
  icon.
icon. - You can set the number of rows to be displayed in the Product listing page by clicking on the drop down option.
- You can add note, comments or view the list of followers of any product by hovering the mouse on it.
- You can perform mass update on the products by clicking on the Action drop down.
- New products can be added to the listing page by clicking on
 .
. - The listing of Products can be viewed in in both column and row formats
 .
. - Product Listing fields can be customized by making the mouse hover on the icon
 and then selecting the fields you want to display.
- You can add comment to a product or copy it by clicking on the Select drop down option.

- You can edit
 or delete a product by hovering the mouse on it.
New Sales Tool
To start, go to Tools from the menu on the left and click on Sales Tools.

On the Sales Tools listing page, you can create a new one by clicking the ![]() button in the top-right corner.
button in the top-right corner.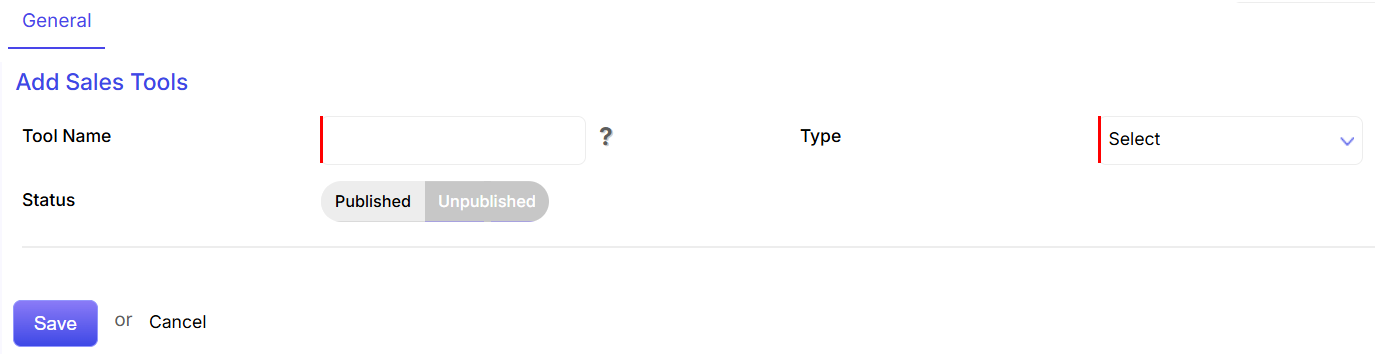
- Tool Name: Enter the name of your sales tool.
- Type: Select a sales tool type from the dropdown menu. ConvergeHub offers four types: Checklist, Conversation Guide, Status, and Text.
- Status: Choose Published to activate the tool immediately or Unpublished to activate it later.
- Save: Click Save to complete the creation process.
A. Checklist as Sales Tool
It can include a list of questions or pointers that the sales representative needs to follow while dealing with the prospects. It can act as a standard handbook to be given to the sales agents before starting to deal with the prospects.
If you choose a checklist as the type of sales tool, then you will have to fill in more fields as shown below: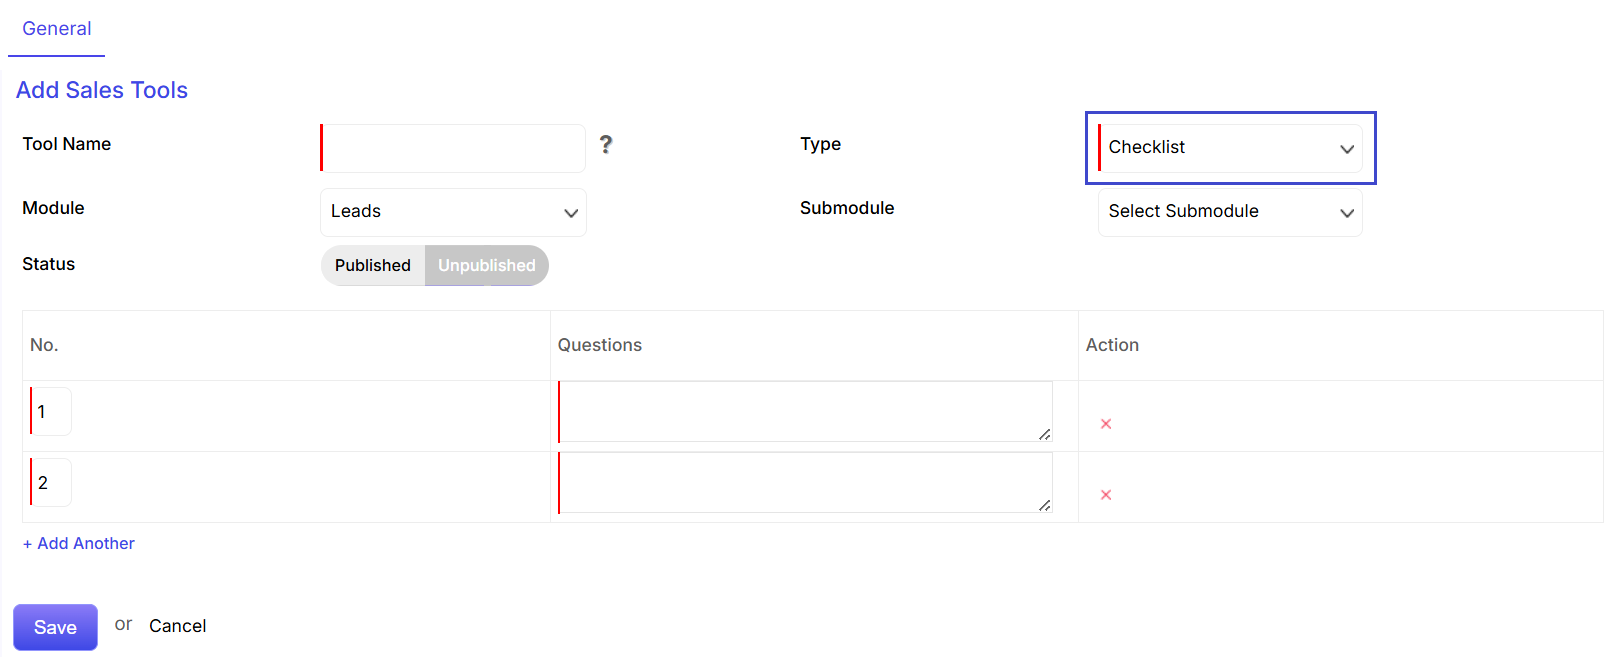
- Module: Select the primary module for which you want to apply the sales tool.
- Submodule: Choose the specific submodule for the sales tool. For example, if you’re creating a product checklist for all leads, “Product” would be the submodule.
- Questions: Add the questions for your checklist.
- Add Another: Click on the +Add Another button to add more questions to your checklist.
B. Conversation Guide as Sales Tool
It can be a rough set of guidelines to provide idea to the sales agents as to how they need to engineer the conversation with the prospects. Unlike the checklist which calls for complete adherence by the sales agents, a conversation guide can function in the form of a general reference point for the sales reps, whenever they are stuck in the interaction.
If you choose a conversation guide as the type of sales tool, then you will have to fill in more fields as shown below: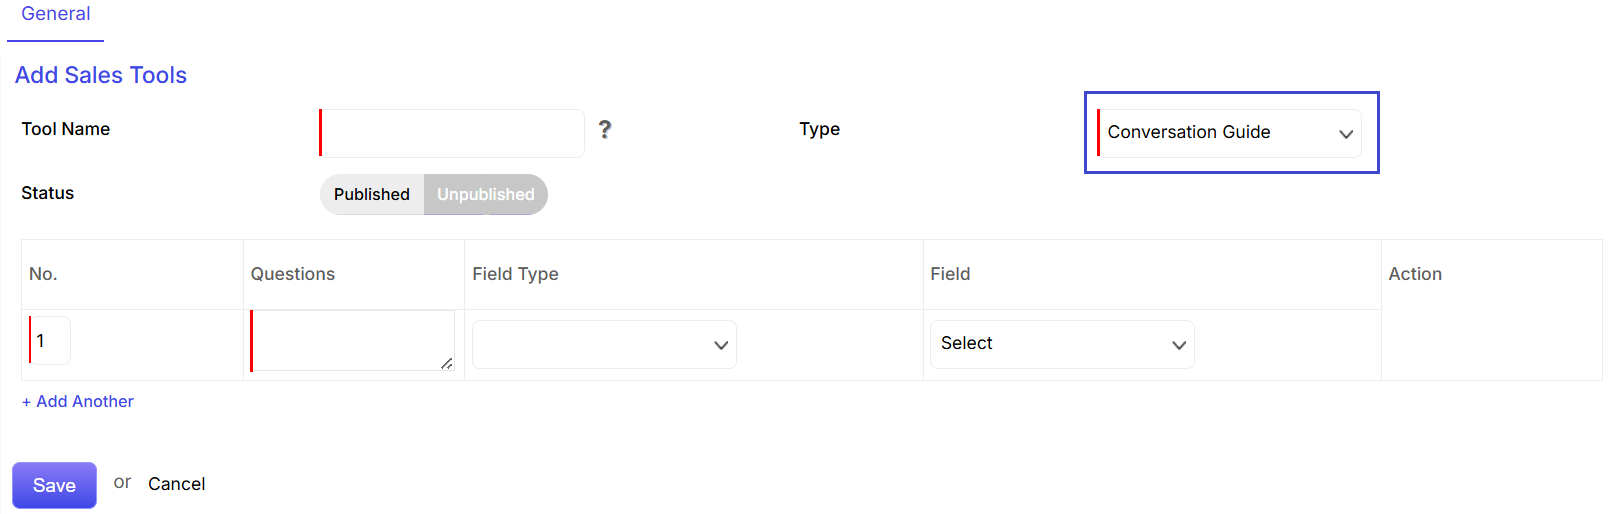
- Questions: Add the question to the conversation guide.
- Add Another: Click on the +Add Another button to add more questions to the conversation guide.
- Field Type: Select the field type from the action drop down.
- Field: Select the related field. For example, if you want to create a conversation guide for all the leads concerning their industry. Then the industry will become the selected field here.
C. Status as Sales Tool
Queries can be asked to the sales representatives who have to give an exact status of whether the scheduled task has been done or not.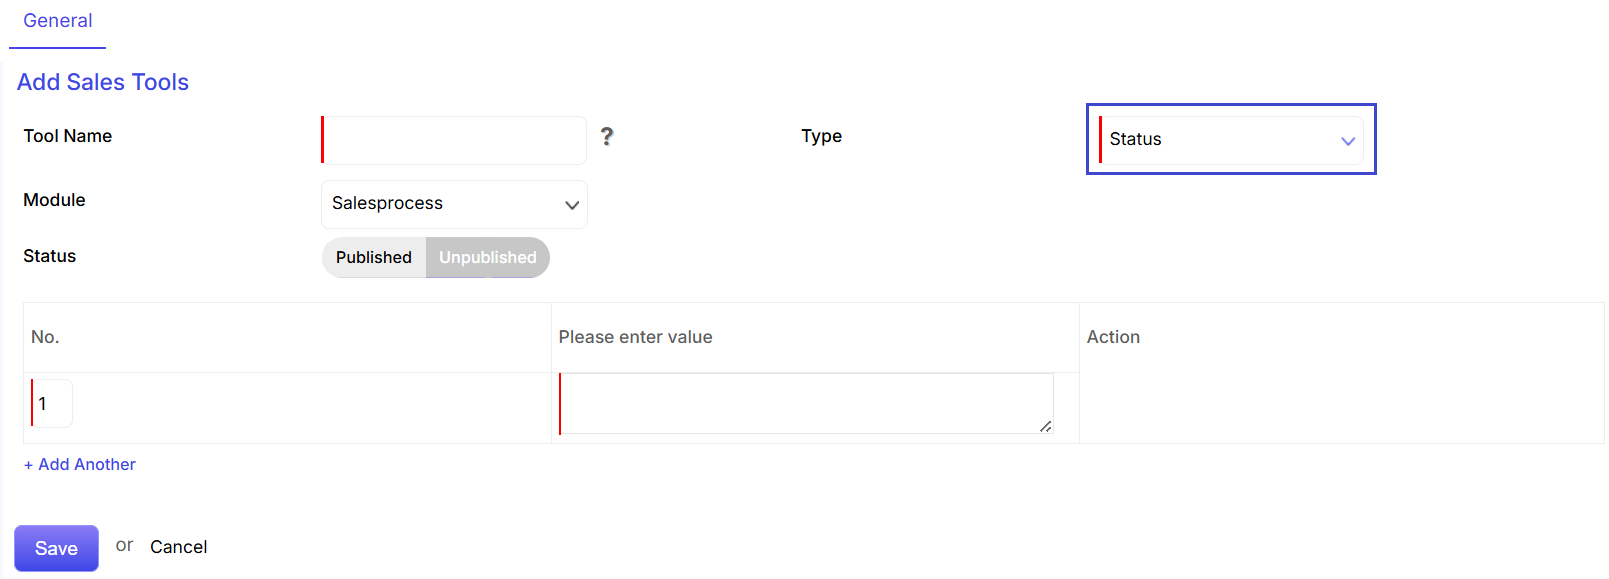
D. Text as Sales Tool
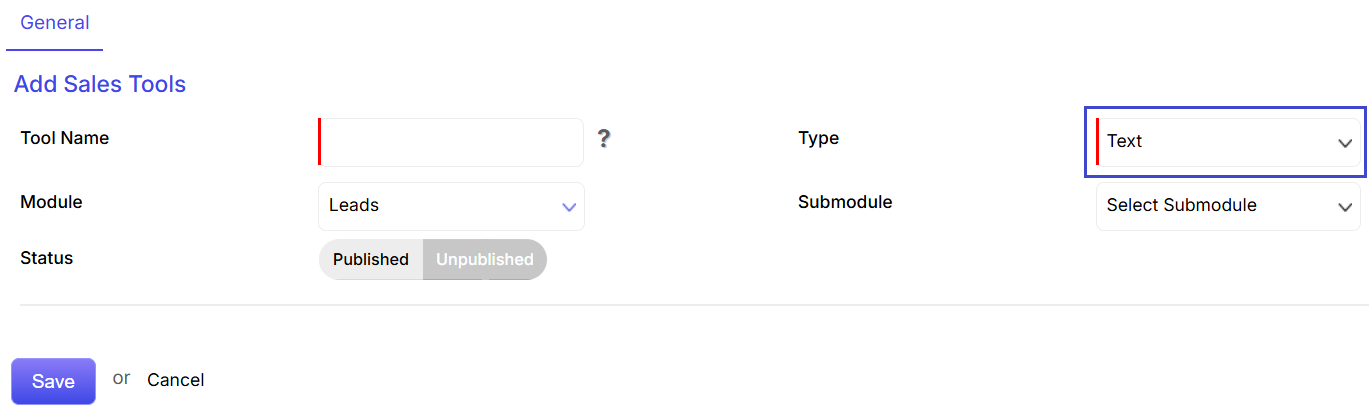
- Module: Select the primary module for your sales tool, such as Leads.
- Submodule: Choose the specific submodule. For instance, you could select Partner and add a simple Text field. When a new partner is added to the Leads sub-panel, this allows you to use a text-based sales tool.
Sales Tools
Admin users can make use of certain sales tools to guide the sales agents and help them steer the clients towards deal closure.
You will learn more about sales tools from the following sections:
Product Details
This page contains all the information that you have added while creating the Product. The information is view able through the General, Price, Stock, Other and Tags tabs.You can view the details of the Leads (potential customers) related to the product. You can also add notes to the product details.
- The product can be added to your favorites by clicking on
 .
. - The product can be followed by clicking on
 . By doing so, you will be able to receive all the product status change and updates in the feeds.
 - You can edit the product detail by clicking on the
 link.
link. - The
 will take you to the previous page.
 - The
 icon helps you create relationship between Leads and add notes to the product.
 - You can Copy and Edit the product details by clicking on the action drop down.

- Details of the product such as Vendor, Manufacturer, Type, Category, Assigned To, Product Code and Comments is displayed under the General category.
- The Stock tab displays the fields – Usage Unit, Quantity in Stock, Handler(individual responsible for the transportation of the product) and Reorder level (the trigger point at which the company will place a new order or start a new manufacturing run).
Feed Tab
You can view all the updates on the corresponding Product through the Feed tab.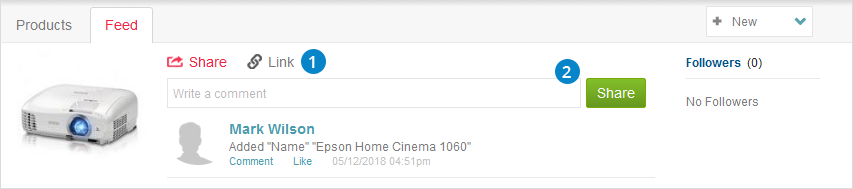
- You can share link from the
 option.
 - You can write your own comment in the comment box and share it with other users by clicking on the
 tab.
tab.
New Product
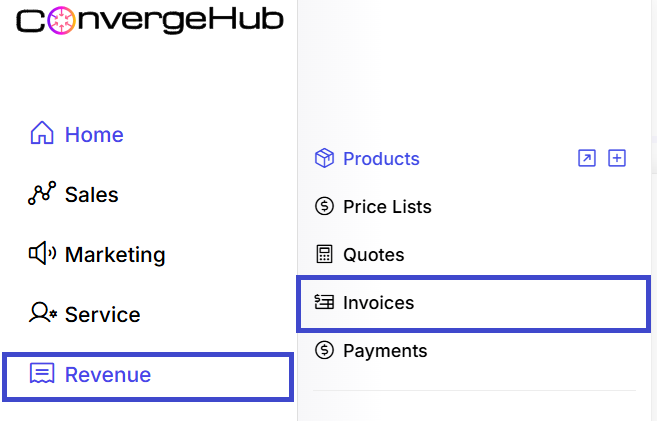
To start, go to Revenue from the menu on the left and click on Products. 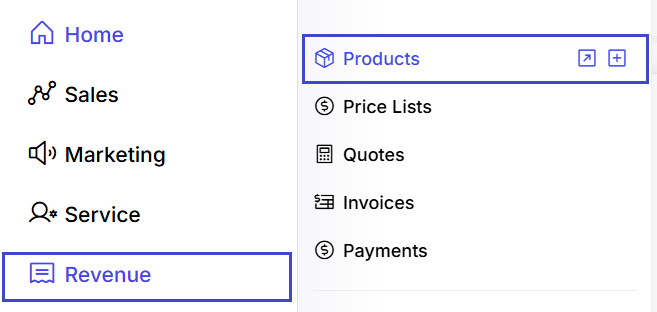
Once you’re on the product list, you can create a new one by clicking the ![]() button in the top-right corner. The Add Product page will open up, containing the necessary fields to be filled.
button in the top-right corner. The Add Product page will open up, containing the necessary fields to be filled.

Fields Overview
Type: Choose from Product, Service, Discount etc.
Name: Enter the product or discount name. (Required)
Price: Enter the price and choose currency (e.g., USD)
Category: Select a product category for classification.
Assigned to: Choose the user or team responsible for managing this product.
Code: Optional internal SKU or reference code.
Taxable: Check Enable if the product is taxable.
Status: Set the product status: Active or Inactive.
Image: Upload an image of the product (optional).
Description: Add details about the product for reference.
Save: Click to add the product to your catalog.
Cancel: Click to discard the entry.
Updating the Workflow
The workflow for a lead/deal can be viewed by adding a new lead/deal. For example –
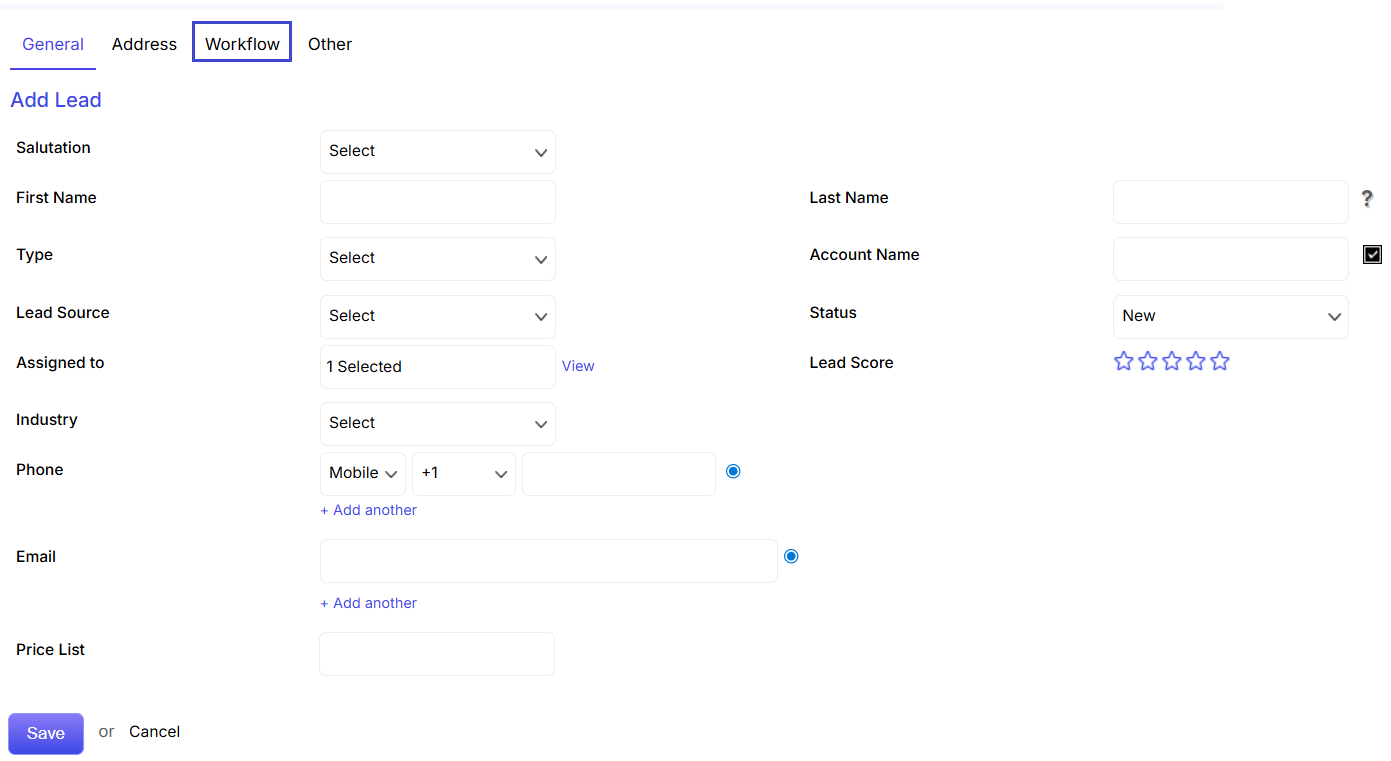
Clicking on the workflow will open up a new page showcasing the sales process activities applicable for the deal/lead.It will show the current status of the activities done and pending.
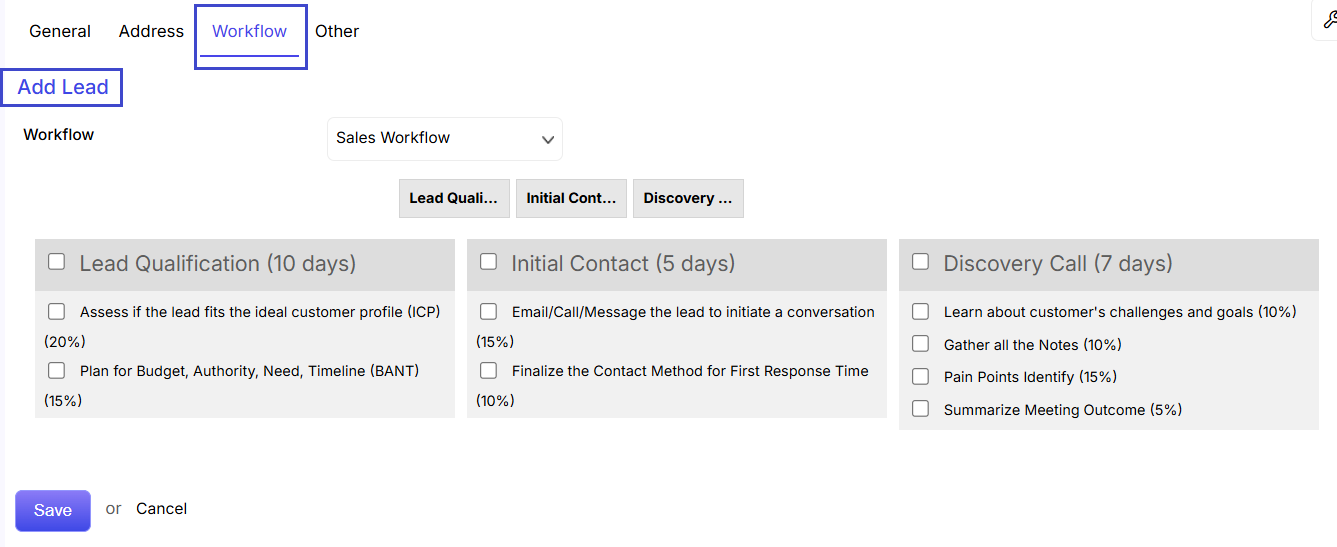
The sales agent to whom the sales process is assigned to, can update the activities done. To update the workflow, the sales agent needs to click on the Edit link at the top and click on the checkbox beside those activities/tasks that has been accomplished.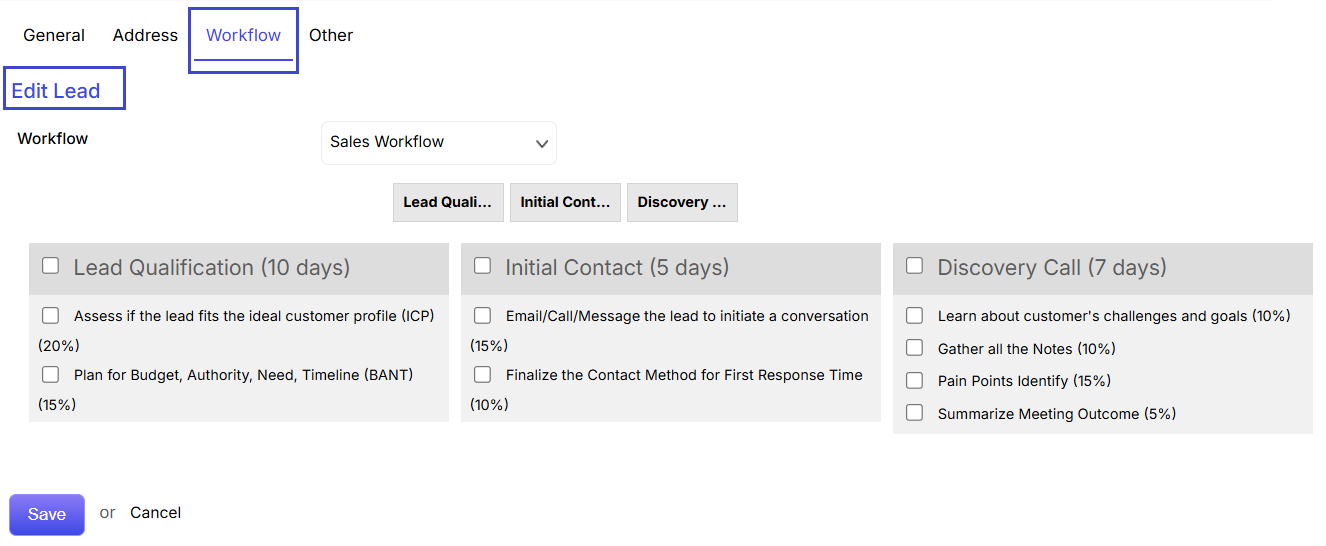
Edit Product
You can edit a product’s details from two locations:
Listing Page: Find the three dots ![]() next to the product you want to edit and select Edit.
next to the product you want to edit and select Edit.
Details Page: Simply click the Edit icon ![]() or choose Edit option from the Action dropdown menu.
or choose Edit option from the Action dropdown menu.
You can modify all product information by navigating through the various tabs.
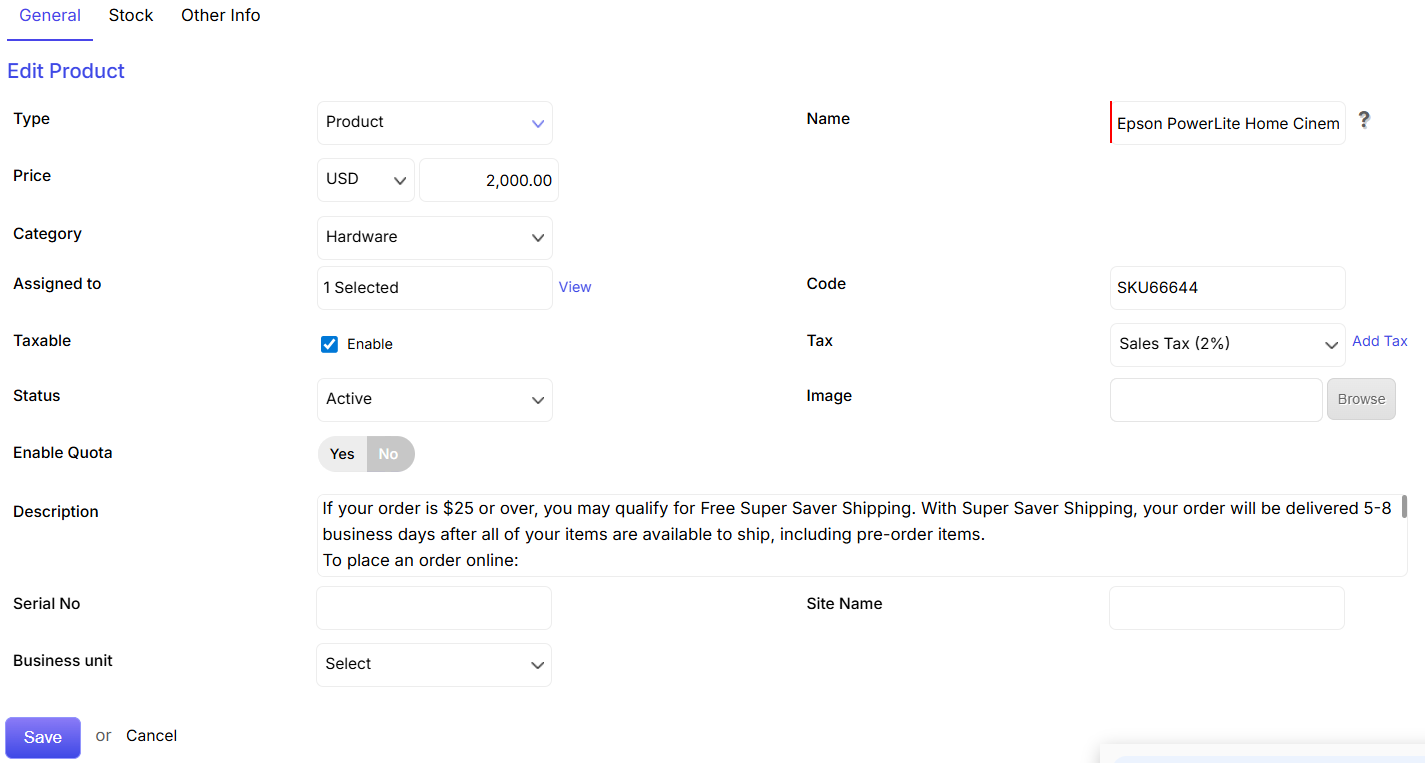
You can edit information of the Product such as Product Name, Product Code, Vendor Name, Manufacturer, Product Type, Product Category, Assigned To and Product Image from the General Tab.
Products
You can add new products, update their details and modify lists through the following modules:
New Invoice
To start, go to Revenue from the menu on the left and click on Invoices.
New Invoice can be added by clicking the ![]() button in the top-right corner of the invoices listing page. Detailed information on the Invoice can be added through the General, Details, and Address tabs.
button in the top-right corner of the invoices listing page. Detailed information on the Invoice can be added through the General, Details, and Address tabs.
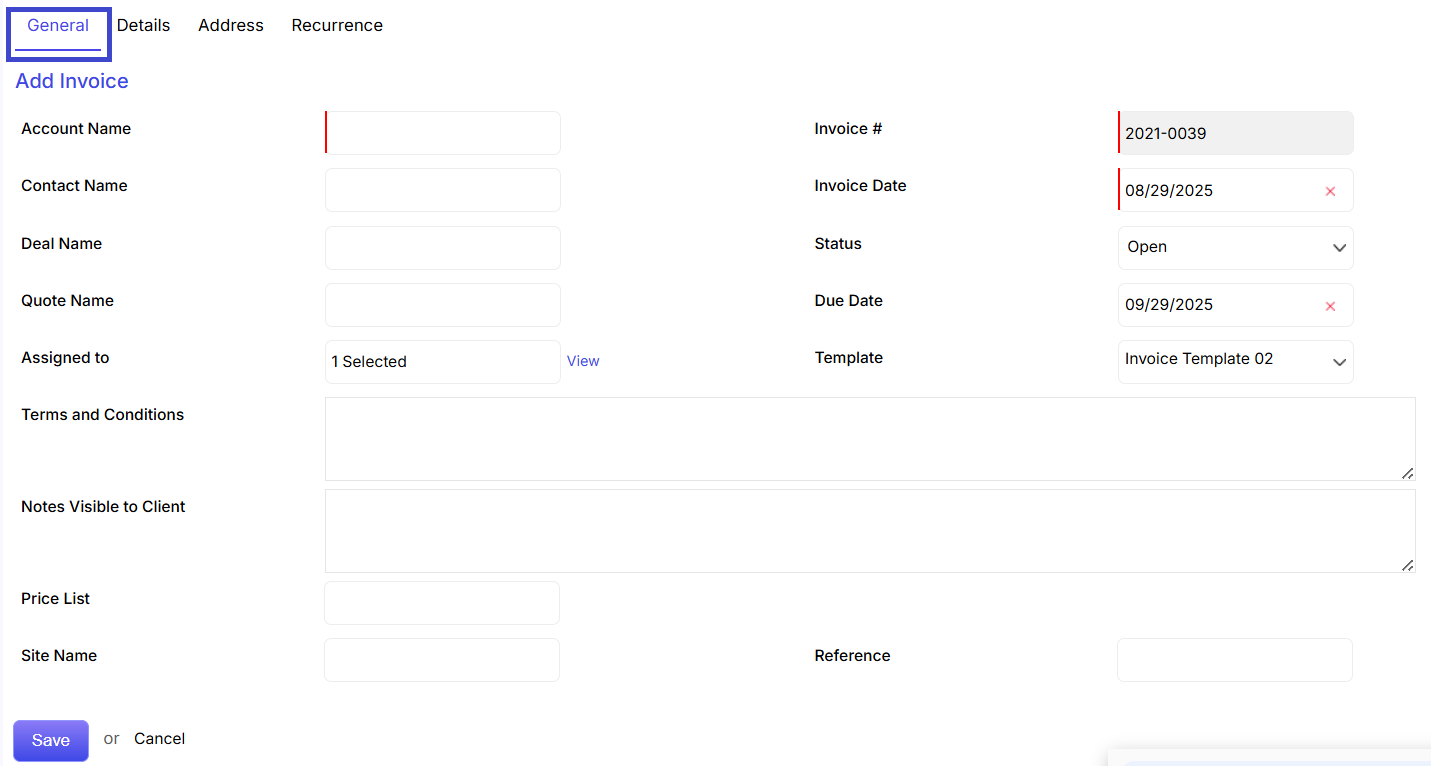
General Tab
Account Name: Customer company (required).
Contact Name: Optional individual contact.
Deal Name / Quote Name: Link to related sales records.
Invoice #: Auto-generated or customizable.
Invoice Date & Due Date: Define billing and payment timelines.
Status: Choose from Open, Paid, Overdue, etc.
Template: Select from available invoice designs.
Terms and Conditions / Notes Visible to Client: Add billing terms and client messages.
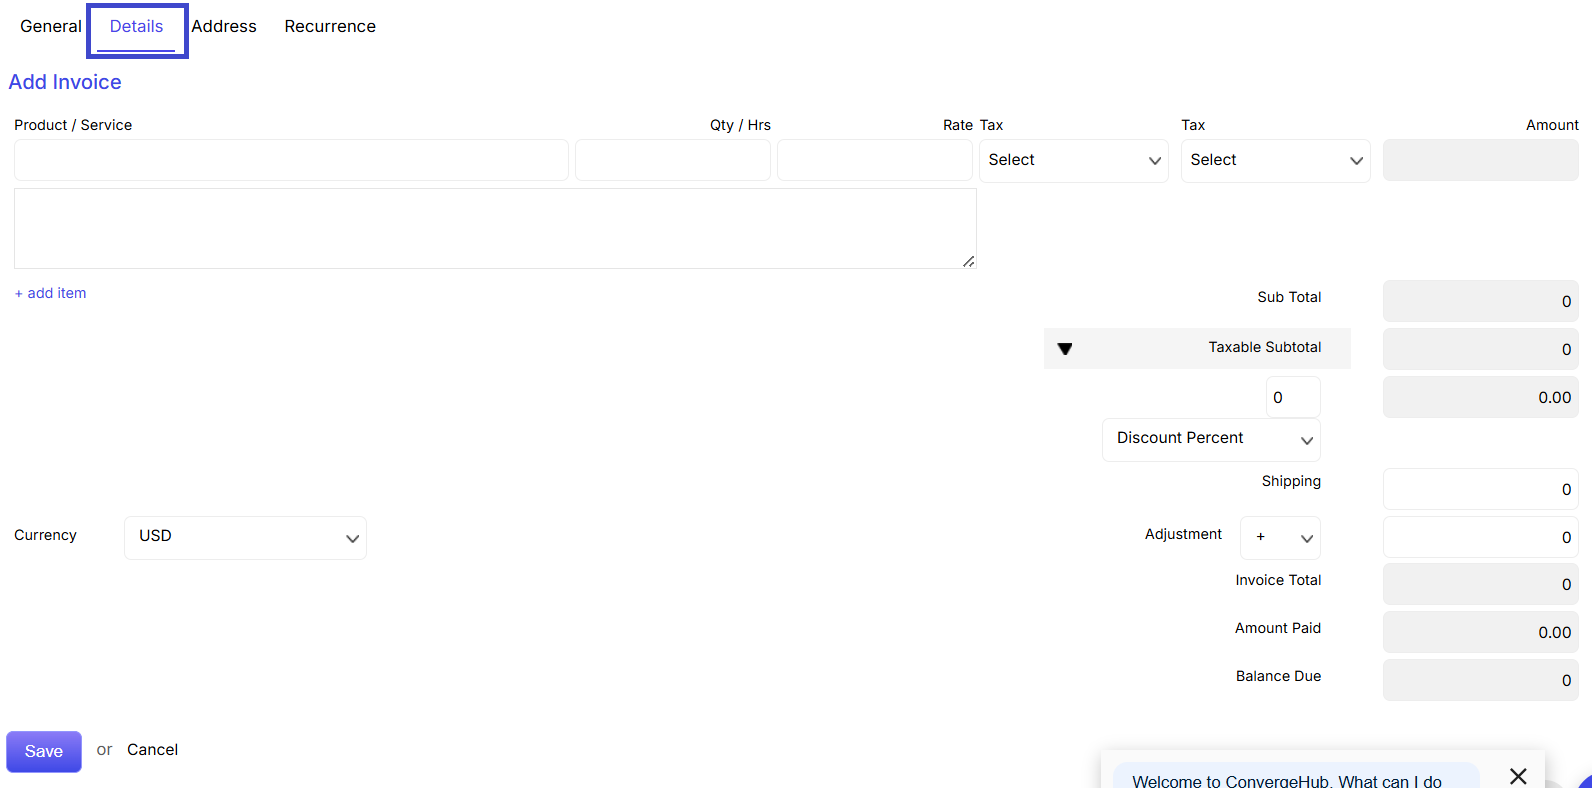
Details Tab
Product / Service Items:
Select items from catalog, specify quantity, rate, and tax.
Use + add item for multiple line entries.
Auto Calculations:
Sub Total, Taxable Subtotal, Discounts, Shipping, Adjustment
Final Invoice Total, Amount Paid, and Balance Due are calculated automatically.
Currency can be set at the bottom.
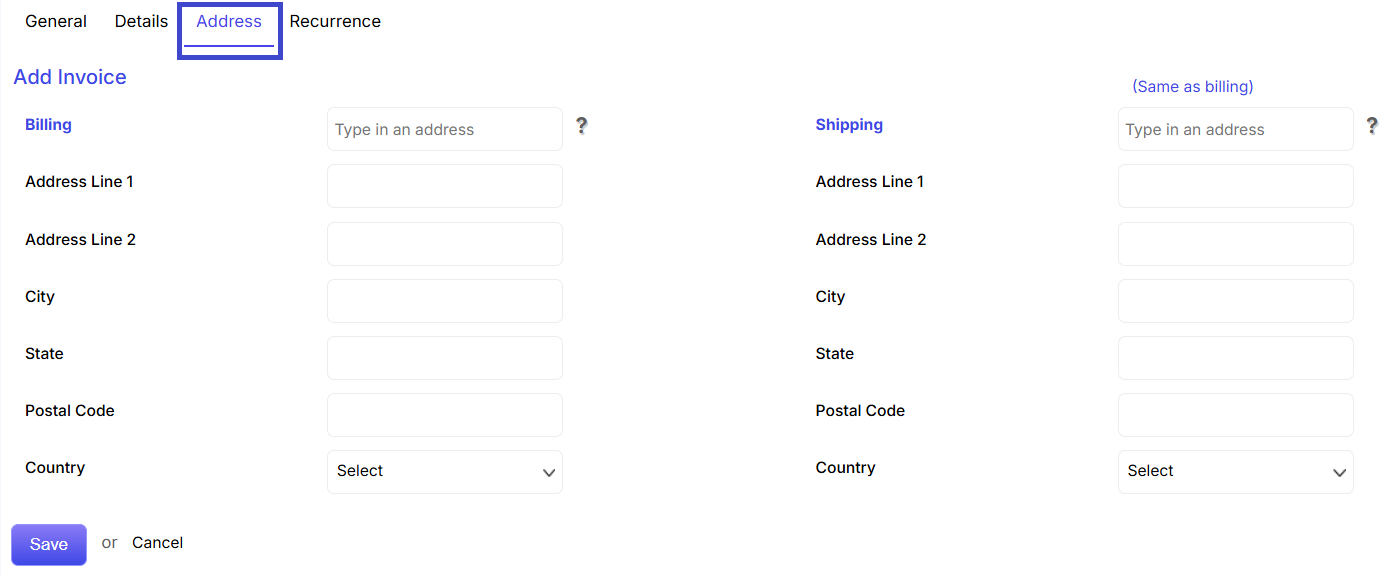
Address Tab
Billing & Shipping Addresses:
Enter details like street, city, postal code, and country.
Use “Same as billing” to copy address fields.
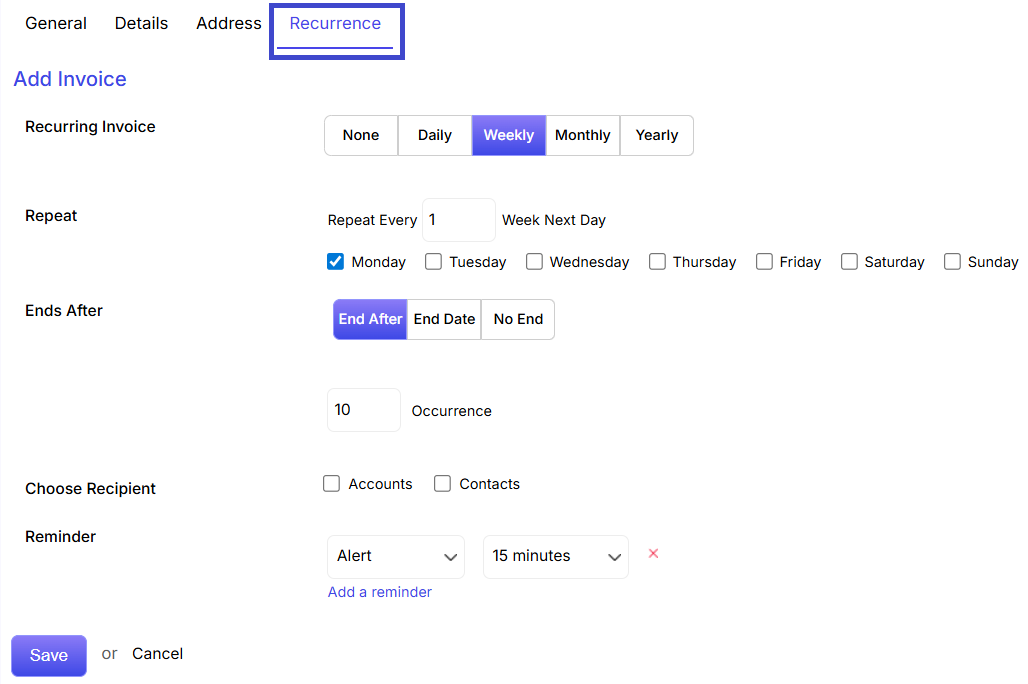
Recurrence Tab (For Recurring Invoices)
Recurring Invoice: Choose Daily, Weekly, Monthly, or Yearly.
Repeat: Set repetition interval and days.
Ends After: Set recurrence limit by occurrences, date, or no end.
Choose Recipient: Accounts or Contacts.
Reminder: Set up pre-reminders (e.g., 15 minutes before).
Finally, click Save to create the invoice.
Click Cancel to discard.